Building your own computer can be very rewarding. This guide will help you through the steps of creating your PC. You’ll learn how to prepare tools and components and install the operating system.
Assembling a computer is not expensive. You can start with a barebones kit for about $200. This makes building your own PC a great option for many.
Building a computer needs focus and a basic understanding of its parts. This guide will teach you how to build your own computer. You’ll learn about cable management and making sure all parts work well together.
With the right tools and patience, you can make a computer that fits your needs and budget. You’ll enjoy the process of building your own system.
This guide will cover the key steps of building a computer. You’ll learn how to prepare the chassis, install the power supply, and connect the front panel. We’ll also talk about the importance of following manuals and being precise during assembly.
By the end of this guide, you’ll know how to build a computer system. You’ll be able to create your own PC confidently, thanks to the skills and knowledge you’ve gained.
Getting Started: Essential Tools and Safety Precautions
Building a computer needs the right PC building tools. You’ll need a screwdriver, wire cutters, and a grounding strap to avoid static damage. A tidy workspace setup is key for a safe and smooth build.
First, get anti-static equipment like an antistatic wrist-strap cable. This protects your computer’s sensitive parts. A clean workspace helps you stay focused and safe.
Here are some must-have tools for your PC building tools kit:
Long Phillips screwdriver
Short Phillips screwdriver
Thermal conductive paste
Disposable wipes or paper with alcohol to degrease
Antistatic (ESD) band or mat
With the right tools and safety steps, you’re ready for a successful build. Be gentle with delicate parts and follow the installation guide for a safe build.
Tool
Description
Antistatic wrist-strap cable
Prevents electrostatic discharge and protects sensitive components
Grounding strap
Prevents electrostatic discharge and ensures a safe working environment
Screwdriver
Essential for assembling and disassembling computer components
Understanding Computer Components and Their Functions
Building a computer system requires knowing the different computer components and their roles. This includes the CPU, motherboard, power supply, memory, and storage devices. Each part is key to the system’s performance and function.
The hardware components of a computer work together. They provide the needed processing power, storage, and input/output operations. For instance, the CPU’s speed affects computer performance. More cores help with multitasking. PC hardware like RAM and hard drives also matter, with more RAM speeding up data processing and hard drives storing data.
Some important computer components are:
Processor (CPU)
Motherboard
Power supply
Memory (RAM)
Storage devices (hard drives, solid-state drives)
Knowing how these hardware components interact helps you choose and install them wisely. This leads to a computer system that works well and efficiently.
Component
Function
Processor (CPU)
Executes instructions and performs calculations
Motherboard
Connects and supports all hardware components
Power supply
Provides power to all components
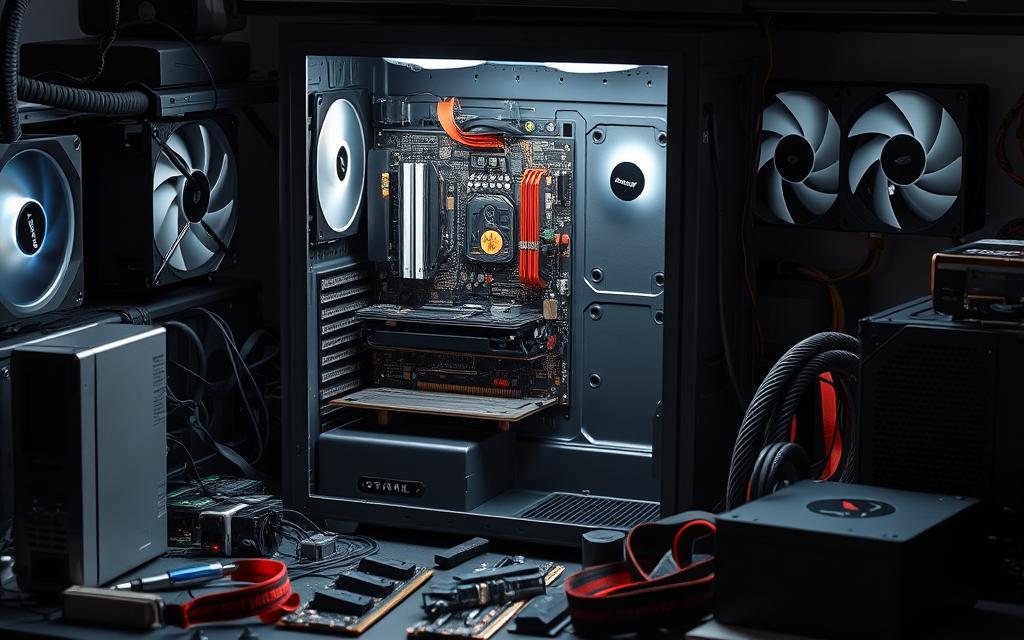
How to Assemble a Computer System: Core Steps
Building a computer system needs several key steps, starting with chassis preparation. This step is vital for a solid base. It’s important to focus on details to make sure everything works well. Breaking down the computer assembly steps into smaller tasks helps make it easier.
The power supply installation is a critical part. It powers all the other parts. So, picking a good power supply is key. Think about how much power your system needs, including the CPU, motherboard, and other parts.
Preparing the Chassis
Begin by removing packaging and screws from the chassis. Then, find where to mount the motherboard and other parts. This is important for a safe and stable setup.
Installing the Power Supply
When putting in the power supply, connect all cables to the motherboard, CPU, and other parts. Make sure it’s tightly fixed to the chassis to avoid any movement.
Motherboard Installation Process
Installing the motherboard needs careful handling to avoid damage. First, take out the motherboard from its box and find the mounting spots on the chassis. Then, line up the motherboard with these spots and screw it in place.
By following these main steps, like chassis preparation and power supply installation, you can build a computer successfully. Always handle each part with care to avoid damage or issues.
Memory and Storage Installation Guide
Choosing the right components for memory installation and storage installation is key. The guide finding your computer’s hardware details helps pick compatible RAM and storage. It’s important to look at speed, capacity, and if they fit with your motherboard.
A good cable management system keeps your build tidy. It helps with airflow and protects your parts. By following the right steps for memory installation and storage installation, you get a system that works well.
Ensuring compatibility with your motherboard
Choosing the right speed and capacity for your needs
Applying the correct amount of pressure when installing RAM modules
By carefully planning and doing your memory installation and storage installation right, you make a strong and efficient system. It will meet your needs well.
Graphics Card and Peripheral Components
Choosing the right graphics card installation is key for your PC. A good graphics card boosts your system’s performance. This lets you run demanding apps and games smoothly. For more on building a PC, check out this website.
Adding peripherals like sound cards and external hard drives can enhance your system. Think about what you need and your budget. Here are some tips for peripheral components:
Make sure they’re compatible with your PC.
Look at their performance and speed.
Consider their power use and efficiency.
Knowing about graphics card installation and peripherals helps you make smart choices. This ensures your system is balanced and efficient. It meets your specific needs.
Component
Description
Graphics Card
Responsible for rendering graphics and video output
Sound Card
Handles audio output and processing
External Hard Drive
Provides additional storage space for files and data
Power Connections and Cable Management
Keeping your system safe and running well is key. This means setting up power connections right and managing cables well. You’ll need to route PSU cables, connect front panel devices, and handle RGB and fan controllers. By doing this, your system will stay neat and free of clutter.
Choosing the right cables and connectors is important to avoid damage. Cable management helps keep things tidy and improves airflow. Cases from NZXT and Corsair are great for this, with special channels and space for cables.
To keep things looking good, use PSU cable routing methods. This means hiding cables behind the motherboard tray. Cable ties or Velcro can also help keep cables neat. Plus, a modular power supply unit can save you time and reduce mess.
Use cable ties or Velcro strips to secure cables in tight bundles
Route cables behind the motherboard tray to achieve a clean and tidy appearance
Invest in a modular power supply unit to reduce clutter and save time
Cable Management Technique
Description
PSU Cable Routing
Routing PSU cables behind the motherboard tray to reduce clutter
Cable Ties
Using cable ties to secure cables in tight bundles
Velcro Strips
Using Velcro strips to secure cables and prevent interference with components
First Boot and BIOS Configuration
After putting your PC together, the first boot and BIOS setup are key. About 90% of builders must tweak the BIOS settings. During the first boot, you’ll enter the BIOS setup to set the boot order. This order tells your PC which devices to check first for booting.
To get into the BIOS, press a specific key like F2, F12, or Del when booting. In the BIOS setup, you can adjust settings like boot order, disk modes, and CPU settings. For more on setting up your PC’s firmware for first use, check online guides.
Here are some important steps for BIOS setup:
Make sure your primary boot device, like an SSD or HDD, is first in the boot order.
Adjust disk transfer modes for better performance.
Save your changes and leave the BIOS setup.
By doing these steps and setting up your BIOS right, you’ll have a smooth PC setup experience. Don’t forget to keep your drivers updated and install antivirus to protect your system.
Component
Setting
CPU Speed
3000MHz
Cache RAM
1024K x2
Default DRAM Timing
800MHz-5-5-5-15-2T
Common Mistakes to Avoid During Assembly
Building a computer can be tricky, and mistakes can cost a lot. It’s key to avoid common errors like compatibility issues and installation mistakes. Knowing these pitfalls helps you build a working system.
Choosing the right components is vital. This means picking RAM, GPU, and CPU that work together well. Incorrect component compatibility can cause problems like instability or damage. Also, installation errors can happen when dealing with sensitive parts.
Component Compatibility Issues
To avoid compatibility problems, research and pick the right parts before you start. Check the motherboard manual and the specs of the CPU and RAM.
Installation Errors
Prevent installation mistakes by following the right steps. Handle parts carefully, use tools that prevent static, and don’t over-tighten screws. A magnetic tray helps keep screws in order.
Testing Problems
After building, test your system well to find any issues. Make sure it boots right, test the RAM, GPU, and CPU, and check that everything works. Avoiding common mistakes helps you build a reliable computer.
Some common mistakes to watch out for include:
Not installing the I/O shield and motherboard stand-offs
Installing fans incorrectly
Placing the CPU incorrectly
Applying incorrect amounts of thermal paste
Incorrectly installing memory modules
Plugging cables into the wrong ports
By knowing these mistakes and taking precautions, you can build a computer that works well and efficiently.
Conclusion: Your Journey to Custom Computing
As you finish this guide, we hope you’re ready and excited to start your custom computing adventure. Building a personalised PC is a fun journey that lets you make a system just for you. You’ll learn to put together a custom computing system that meets your needs and wants.
Building a PC might seem hard at first, but with time and effort, you’ll get better. You’ll become more confident in PC building. Just remember to be patient, stay focused, and keep learning. With the right tools and components, you’ll make a computer that’s just what you need.
FAQ
What are the essential tools and safety precautions required for computer assembly?
To build a computer safely, you need anti-static gear like a grounding strap. Also, have a tidy workspace. Basic tools like a screwdriver and wire cutters are key for the job.
How do I understand the functions of different computer components?
It’s vital to know what each part does. This includes the CPU, motherboard, power supply, memory, and storage. Understanding how they work together helps you make smart choices during assembly.
What are the core steps in the computer assembly process?
The main steps are getting the chassis ready, installing the power supply, and mounting the motherboard. You also need to set up the CPU and cooling, and manage cables well.
How do I install memory and storage devices correctly?
Installing RAM, SSDs, and HDDs right is key. So is good cable management. These steps boost your system’s memory and storage.
What considerations are important when installing graphics cards and peripheral components?
Knowing about graphics cards and other parts helps you choose wisely. This improves your system’s performance and features.
How do I ensure proper power connections and cable management?
It’s important to route PSU cables well and connect front panel devices. Managing RGB and fan controllers also keeps your system safe and efficient.
What steps are involved in the first boot and BIOS configuration?
Setting up the BIOS and configuring the boot order are critical. Saving these changes optimises your system’s performance.
What are the common mistakes to avoid during computer assembly?
Staying away from compatibility issues, installation mistakes, and testing problems is essential. This ensures your computer is stable and works well.
To enjoy karaoke at home, you need a computer, karaoke software, a microphone, and a speaker. These basics will help you have a fun karaoke experience. Setting up your home karaoke system is simple with the right tools and a bit of guidance. A home karaoke setup includes a computer, karaoke software, a microphone, and…
An operating system serves as the backbone of any computing device. It manages critical resources like the CPU, memory, and devices, ensuring smooth functionality. Acting as a bridge between hardware and software, it allows users to run applications efficiently. Different types of operating systems cater to unique computing needs. From desktops to smartphones, each OS…
Computer system management is crucial for the success of modern businesses. It ensures IT systems work smoothly to aid business activities. By bringing together hardware, software, and networks, it provides dependable IT services. These services can change to meet new organisational needs, boosting productivity. Knowing how important computer system management is, is key. This includes…
The Internet links countless computer networks across the globe. It allows these networks to talk to each other using set rules. This network includes billions of computers and devices, making sharing and getting information easy. The idea started in 1969 by the Advanced Research Projects Agency (ARPA). They wanted to connect different university computers to…
Upgrading your computer’s operating system is easier than you think. It brings the latest features, security, and performance boosts. This guide will walk you through the process, covering the benefits, preparations, and possible issues. At first, upgrading might seem scary. But, with the right info, you can make your computer faster. This applies to Windows,…
Legacy computer systems are outdated yet crucial technological infrastructures in organisations. They maintain essential business operations despite lacking active support or updates. These systems are vital for many companies, even with their limitations. Legacy software is a key consideration in today’s complex tech landscape. It includes hardware and software that remain integral to an organisation’s…